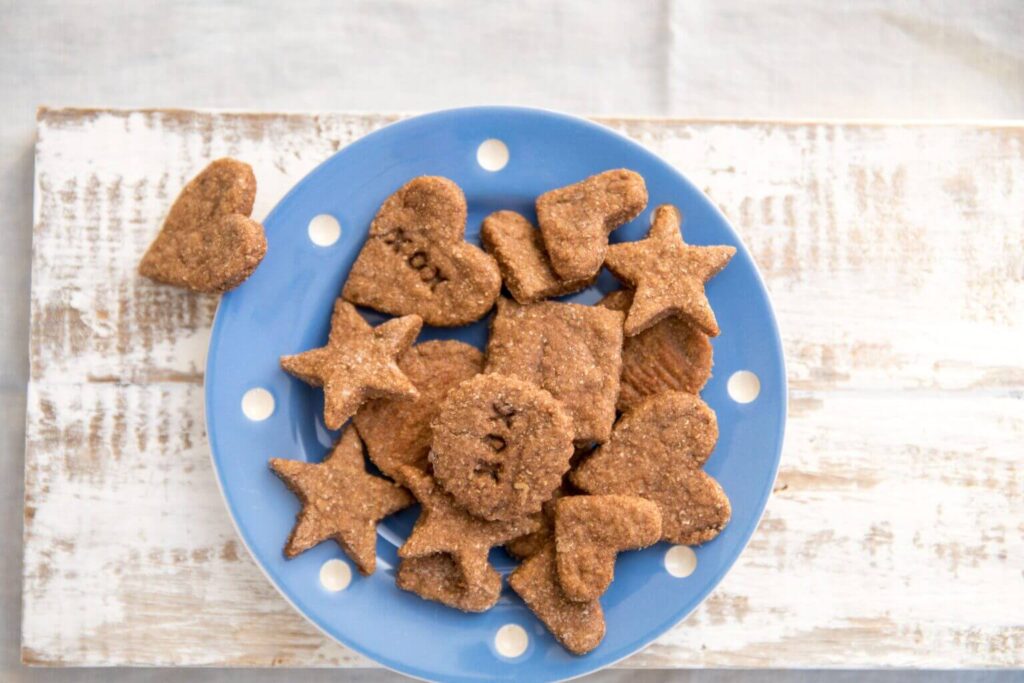
Homemade Iron-Rich Teething Biscuits for Baby-Led Weaning

These yummy teething biscuits are made especially for babies aged 6-18 months, and are perfect for soothing baby’s gums and nourishing their growing bodies!
As a registered dietitian and mom of 3, I know just how hard it is to find nutritious and convenient baby foods that you can feel good about feeding your little ones. Don’t get me wrong… there are many biscuits, cookies, pouches, and other snack items out there, and it’s totally ok to buy and serve these sometimes. But most of these packages baby and toddler snacks lack nutrition and contain extra ingredients that baby doesn’t need. That’s why I love finding (and creating) easy, cost-effective baby snack recipes at home when I can.
These iron-rich teething biscuits were all of my babies’ faves. They’re naturally sweetened with ripe banana, and iron-rich because I substituted ½ of the flour for iron-fortified infant cereal. This is one of our feature baby-led weaning recipes in Food to Grow On – if you have little ones and haven’t ordered your copy yet, you must!

Get Support That Makes Mealtimes Easier
Struggling with picky eating, mealtime battles, or other food or body image worries? Our team of registered dietitians at Centred Nutrition Collective offers virtual family nutrition counselling across Canada. We’ll help you feel more confident and supported with feeding — and many plans are covered by benefits.
Why did I use infant cereal in teething biscuits?
Iron-fortified infant cereal used to be the staple “first food” that every mom fed their baby when starting solids. Some call it “pablum” and others just “baby cereal”. Traditionally, you would mix it with a bit of breastmilk, formula or water and serve it to baby with a spoon (and some parents still do this, which is great!). I recommend that parents buy a whole grain, nutrient-dense variety such as oat, barley or mixed grain. For this recipe, I thought it would be a good idea to use infant cereal to add texture and iron to a finger food: teething biscuits!

What is Baby-Led Weaning?
Now that we know how important it is to introduce baby to a variety of food textures right from 6 months, it’s less common to spoon feed purees, and more common to allow baby to self-feed with soft, safe finger foods. As long as you’re allowing baby to lead, whether by self-feeding or you spoon-feeding, both are ok. My suggestion is actually to introduce both methods (self-feeding with finger foods and spoon-feeding responsively) so that baby gets a nice variety of textures and experiences. If you choose to allow baby to self-feed exclusively, this is called “Baby-Led Weaning”. Check out my comprehensive guide on baby-led weaning.

The importance of iron for baby
Nutrition experts (and parents) worry about adequate iron intake if you choose baby-led weaning. Iron-rich foods such as red meat, fish, legumes, and eggs are important for babies over 6 months of age, as their iron stores have been depleted.
Babies who are fed using baby-led weaning may fall short of iron, which puts them at risk for iron deficiency anemia. It’s a bit more challenging to ensure baby receives enough of this nutrient when they’re exclusively self-feeding. Quite simply, they may not pick up and eat those strips of meat or pieces of scrambled egg. And you certainly don’t want to force it! That’s why I like to add iron-rich foods (like iron-fortified baby cereal, lentils, meat, poultry or fish to any finger food I can, and why I decided to substitute some of the flour out of this recipe and add in infant cereal.
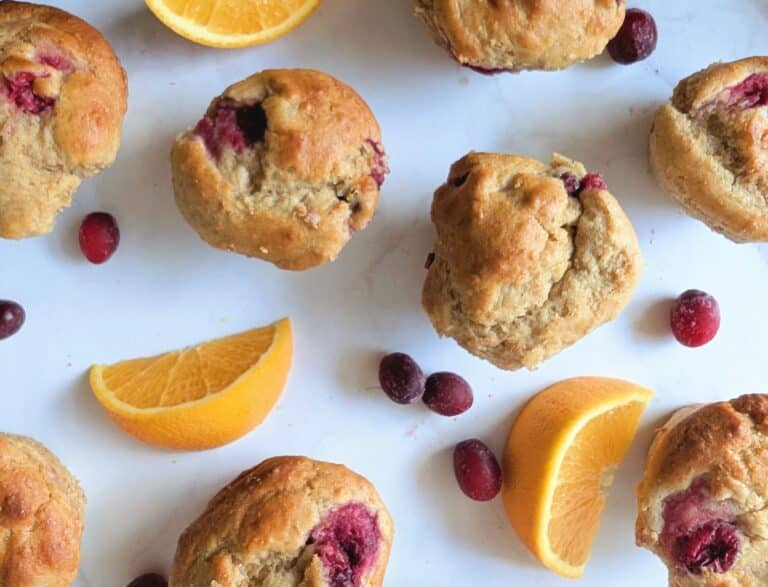
Homemade iron-rich teething biscuits are super fun for babies because they’re delicious and can be made into fun shapes using cookie cutters! My go-to cookie cutter was a firetruck! Enlist the help of your older kids for a fun activity.


Healthy Homemade Teething Biscuits for Baby
Ingredients
- 1 banana
- 1/2 cup iron-fortified cereal
- 1/2 cup whole wheat flour
- 1 tbsp coconut oil
- 1 tbsp cinnamon
- 2 tbsp or more of water to get sticky consistency
Instructions
- Preheat oven to 400F. Line a baking sheet with parchment paper.
- In a large bowl, combine the banana, cereal, flour, oil, cinnamon, and water to reach a dough-like consistency.
- Roll out the dough on a floured surface until ¼ – ½ inch thick. Use cookie cutters to cut out shapes.
- Transfer to the prepared baking sheet. Bake for 15 minutes. Cool and serve or store in the freezer for up to 3 months.
Notes


Sarah Remmer, RD, is a registered dietitian and mom of three, specializing in family and pediatric nutrition. She’s the founder of Centred Nutrition Collective and has nearly 20 years of experience helping families feel confident about feeding their kids.
This post may contain affiliate links. View our policy.


hi these look so good! i was wondering if we could sub some purées in for the banana? we have so many left unused it would be nice to find somewhere to put them
Hi Kaitlyn, that is a brilliant idea! I say go for it!
What texture should these end up?
Great question, Danielle! They’re soft enough to chew without hurting a sore mouth, but can stand up to plenty of drool.
Hi Sarah!
These look amazing but I was wondering if the coconut oil can be substituted with something else since I don’t have any at hand and I have ripe bananas at hand already.
Thanks in advance!
Hi Esha! Thanks so much for taking the time to comment. Absolutely, you could use whichever oil or fat you’d like. e.g. butter, olive oil… I hope that helps!
Yes! Thank you
Hi!
One tablespoon of cinnamon seems like a lot! Is this the correct measurement? Thanks 🙂
I personally find cinnamon mild enough to use larger amounts, but you’re more than welcome to use 1-2 tsp. Thanks so much for trying them!
Hi can I use oat flour instead of whole wheat flour? Also, the dough like consistency is not sticky or should it be sticky? Thank you!
You sure can! It should be somewhat sticky. If you need to add a bit more liquid or flour, feel free to adjust!
Can I use all baby cereal instead of any flour? I don’t have whole wheat.
Great question, Sara! I haven’t tried it with just baby cereal. The texture may be slightly different, but worth experimenting with. Alternatively, if you have all purpose flour, that would work well, too. Let me know how it turns out!
We make these weekly – she loves them! I love how nutritious they are too
I made these and my son loves them! Going to make another batch today but I’m going to add a bit of ground clove because thats also super great for teething and will blend well with the cinnamon flavor.
You just made my day, Ana! Thank you so much for taking the time to comment. I’m so glad that your son loves these! 🙂
Fantastic! My 6mo old granddaughter loved them!!! They kept their form and didn’t break down while being sucked on in babies mouth. I did substitute Sunrise Flour mill organic whole wheat flour for the oat flour and cereal. I also added 1/2t clove.
Love this so much! Thanks for taking the time to write a lovely review! 🙂
Hi Sarah! Thanks so much for the recipe. I am wondering if these are supposed to be crisp or soft. Mine turned out more like a banana jerky. My banana was pretty large so maybe that was an issue?
Hi Debbie! Sorry for the late reply! Great question — and “banana jerky” made me laugh because that can definitely happen with these These biscuits are meant to be fairly firm and dry on the outside (so babies can safely gnaw on them while teething), but they shouldn’t be tough or leathery.
A very large banana could definitely change the texture, since extra moisture can make the dough thinner and cause them to dry out more in the oven. A couple things you could try next time:
• Use a medium banana or measure about ½ cup mashed banana
• If the dough feels sticky, add a little extra flour or infant cereal
• Bake just until firm and lightly golden, and keep an eye on them near the end of baking
They should end up firm enough for baby to hold and chew on, but still a little tender inside.
Thanks so much for trying the recipe and for the great question!
This is SUCH a fantastic recipe! I added a few pureed strawberries for the vitamin C and did half cinnamon/half 5 spice powder (because I’m out of cloves) and my teething 8 mo. old loves these. Great texture-not too crunchy or soft.
Amazing! Thanks for sharing, JC! So glad you and your little one loves them.